1. cfg文件

在YOLOv3中,修改网络结构很容易,只需要修改cfg文件即可。目前,cfg文件支持convolutional, maxpool, unsample, route, shortcut, yolo这几个层。

而且作者也提供了多个cfg文件来进行网络构建,比如:yolov3.cfg、yolov3-tiny.cfg、yolov3-spp.cfg、csresnext50-panet-spp.cfg文件(提供的yolov3-spp-pan-scale.cfg文件,在代码级别还没有提供支持)。

如果想要添加自定义的模块也很方便,比如说注意力机制模块、空洞卷积等,都可以简单地得到添加或者修改。

为了更加方便的理解cfg文件网络是如何构建的,在这里推荐一个Github上的网络结构可视化软件:Netron,下图是可视化yolov3-tiny的结果:

2. 网络模型构建

train.py文件入手,其中涉及的网络构建的代码为:

1
2
# Initialize model
model = Darknet(cfg, arc=opt.arc).to(device)

然后沿着Darknet实现进行讲解:

1
2
3
4
5
6
7
8
9
10
11
12
13
class Darknet(nn.Module):
# YOLOv3 object detection model
def __init__(self, cfg, img_size=(416, 416), arc='default'):
super(Darknet, self).__init__()
self.module_defs = parse_model_cfg(cfg)
self.module_list, self.routs = create_modules(self.module_defs, img_size, arc)
self.yolo_layers = get_yolo_layers(self)

# Darknet Header
self.version = np.array([0, 2, 5], dtype=np.int32)
# (int32) version info: major, minor, revision
self.seen = np.array([0], dtype=np.int64)
# (int64) number of images seen during training

以上文件中,比较关键的就是成员函变量module_defsmodule_listroutsyolo_layers四个成员函数,先对这几个参数的意义进行解释:

2.1 module_defs

调用了parse_model_cfg函数,得到了module_defs对象。实际上该函数是通过解析cfg文件,得到一个list,list中包含多个字典,每个字典保存的内容就是一个模块内容,比如说:

1
2
3
4
5
6
7
[convolutional]
batch_normalize=1
filters=128
size=3
stride=2
pad=1
activation=leaky

函数代码如下:

1
2
3
4
5
6
7
8
9
10
11
12
13
14
15
16
17
18
19
20
21
22
23
24
25
26
27
28
29
30
31
32
33
34
35
36
37
38
39
40
41
42
43
44
45
46
47
48
49
50
51
52
def parse_model_cfg(path):
# path参数为: cfg/yolov3-tiny.cfg
if not path.endswith('.cfg'):
path += '.cfg'
if not os.path.exists(path) and os.path.exists('cfg' + os.sep + path):
path = 'cfg' + os.sep + path

with open(path, 'r') as f:
lines = f.read().split('\n')

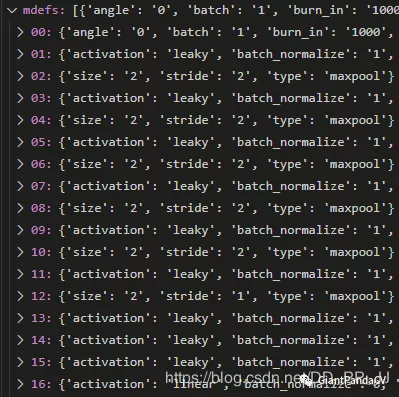
# 去除以#开头的,属于注释部分的内容
lines = [x for x in lines if x and not x.startswith('#')]
lines = [x.rstrip().lstrip() for x in lines]
mdefs = [] # 模块的定义
for line in lines:
if line.startswith('['): # 标志着一个模块的开始
'''
比如:
[shortcut]
from=-3
activation=linear
'''
mdefs.append({})
mdefs[-1]['type'] = line[1:-1].rstrip()
if mdefs[-1]['type'] == 'convolutional':
mdefs[-1]['batch_normalize'] = 0
# pre-populate with zeros (may be overwritten later)
else:
# 将键和键值放入字典
key, val = line.split("=")
key = key.rstrip()
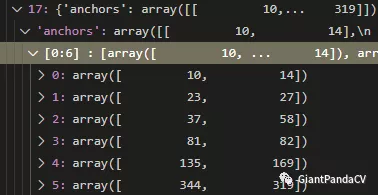
if 'anchors' in key:
mdefs[-1][key] = np.array([float(x) for x in val.split(',')]).reshape((-1, 2)) # np anchors
else:
mdefs[-1][key] = val.strip()

# 支持的参数类型
supported = ['type', 'batch_normalize', 'filters', 'size',\
'stride', 'pad', 'activation', 'layers', 'groups',\
'from', 'mask', 'anchors', 'classes', 'num', 'jitter', \
'ignore_thresh', 'truth_thresh', 'random',\
'stride_x', 'stride_y']

# 判断所有参数中是否有不符合要求的key
f = []
for x in mdefs[1:]:
[f.append(k) for k in x if k not in f]
u = [x for x in f if x not in supported] # unsupported fields
assert not any(u), "Unsupported fields %s in %s. See https://github.com/ultralytics/yolov3/issues/631" % (u, path)

return mdefs

返回的内容通过debug模式进行查看:

其中需要关注的就是anchor的组织:

可以看出,anchor是按照每两个一对进行组织的,与我们的理解一致。

2.2 module_list&routs

这个部分是本文的核心,也是理解模型构建的关键。

在pytorch中,构建模型常见的有通过Sequential或者ModuleList进行构建。

通过Sequential构建

1
2
3
4
model=nn.Sequential()
model.add_module('conv',nn.Conv2d(3,3,3))
model.add_module('batchnorm',nn.BatchNorm2d(3))
model.add_module('activation_layer',nn.ReLU())

或者

1
2
3
4
5
model=nn.Sequential(
nn.Conv2d(3,3,3),
nn.BatchNorm2d(3),
nn.ReLU()
)

或者

1
2
3
4
5
6
from collections import OrderedDict
model=nn.Sequential(OrderedDict([
('conv',nn.Conv2d(3,3,3)),
('batchnorm',nn.BatchNorm2d(3)),
('activation_layer',nn.ReLU())
]))

通过sequential构建的模块内部实现了forward函数,可以直接传入参数,进行调用。

通过ModuleList构建

1
2
3
model=nn.ModuleList([nn.Linear(3,4),
nn.ReLU(),
nn.Linear(4,2)])

ModuleList类似list,内部没有实现forward函数,使用的时候需要构建forward函数,构建自己模型常用ModuleList函数建立子模型,建立forward函数实现前向传播。

在YOLOv3中,灵活地结合了两种使用方式,通过解析以上得到的module_defs,进行构建一个ModuleList,然后再通过构建forward函数进行前向传播即可。

具体代码如下:

1
2
3
4
5
6
7
8
9
10
11
12
13
14
15
16
17
18
19
20
21
22
23
24
25
26
27
28
29
30
31
32
33
34
35
36
37
38
39
40
41
42
43
44
45
46
47
48
49
50
51
52
53
54
55
56
57
58
59
60
61
62
63
64
65
66
67
68
69
70
71
72
73
74
75
76
77
78
79
80
81
82
83
84
85
86
87
88
89
90
91
92
93
94
95
96
97
98
99
100
101
102
103
104
105
106
107
108
109
110
111
112
113
114
115
116
117
118
119
120
121
122
123
124
125
126
127
128
129
def create_modules(module_defs, img_size, arc):
# 通过module_defs进行构建模型
hyperparams = module_defs.pop(0)
output_filters = [int(hyperparams['channels'])]
module_list = nn.ModuleList()
routs = [] # 存储了所有的层,在route、shortcut会使用到。
yolo_index = -1

for i, mdef in enumerate(module_defs):
modules = nn.Sequential()
'''
通过type字样不同的类型,来进行模型构建
'''
if mdef['type'] == 'convolutional':
bn = int(mdef['batch_normalize'])
filters = int(mdef['filters'])
size = int(mdef['size'])
stride = int(mdef['stride']) if 'stride' in mdef else (int(
mdef['stride_y']), int(mdef['stride_x']))
pad = (size - 1) // 2 if int(mdef['pad']) else 0
modules.add_module(
'Conv2d',
nn.Conv2d(
in_channels=output_filters[-1],
out_channels=filters,
kernel_size=size,
stride=stride,
padding=pad,
groups=int(mdef['groups']) if 'groups' in mdef else 1,
bias=not bn))
if bn:
modules.add_module('BatchNorm2d',
nn.BatchNorm2d(filters, momentum=0.1))
if mdef['activation'] == 'leaky': # TODO: activation study https://github.com/ultralytics/yolov3/issues/441
modules.add_module('activation', nn.LeakyReLU(0.1,
inplace=True))
elif mdef['activation'] == 'swish':
modules.add_module('activation', Swish())
# 在此处可以添加新的激活函数

elif mdef['type'] == 'maxpool':
# 最大池化操作
size = int(mdef['size'])
stride = int(mdef['stride'])
maxpool = nn.MaxPool2d(kernel_size=size,
stride=stride,
padding=int((size - 1) // 2))
if size == 2 and stride == 1: # yolov3-tiny
modules.add_module('ZeroPad2d', nn.ZeroPad2d((0, 1, 0, 1)))
modules.add_module('MaxPool2d', maxpool)
else:
modules = maxpool

elif mdef['type'] == 'upsample':
# 通过近邻插值完成上采样
modules = nn.Upsample(scale_factor=int(mdef['stride']),
mode='nearest')

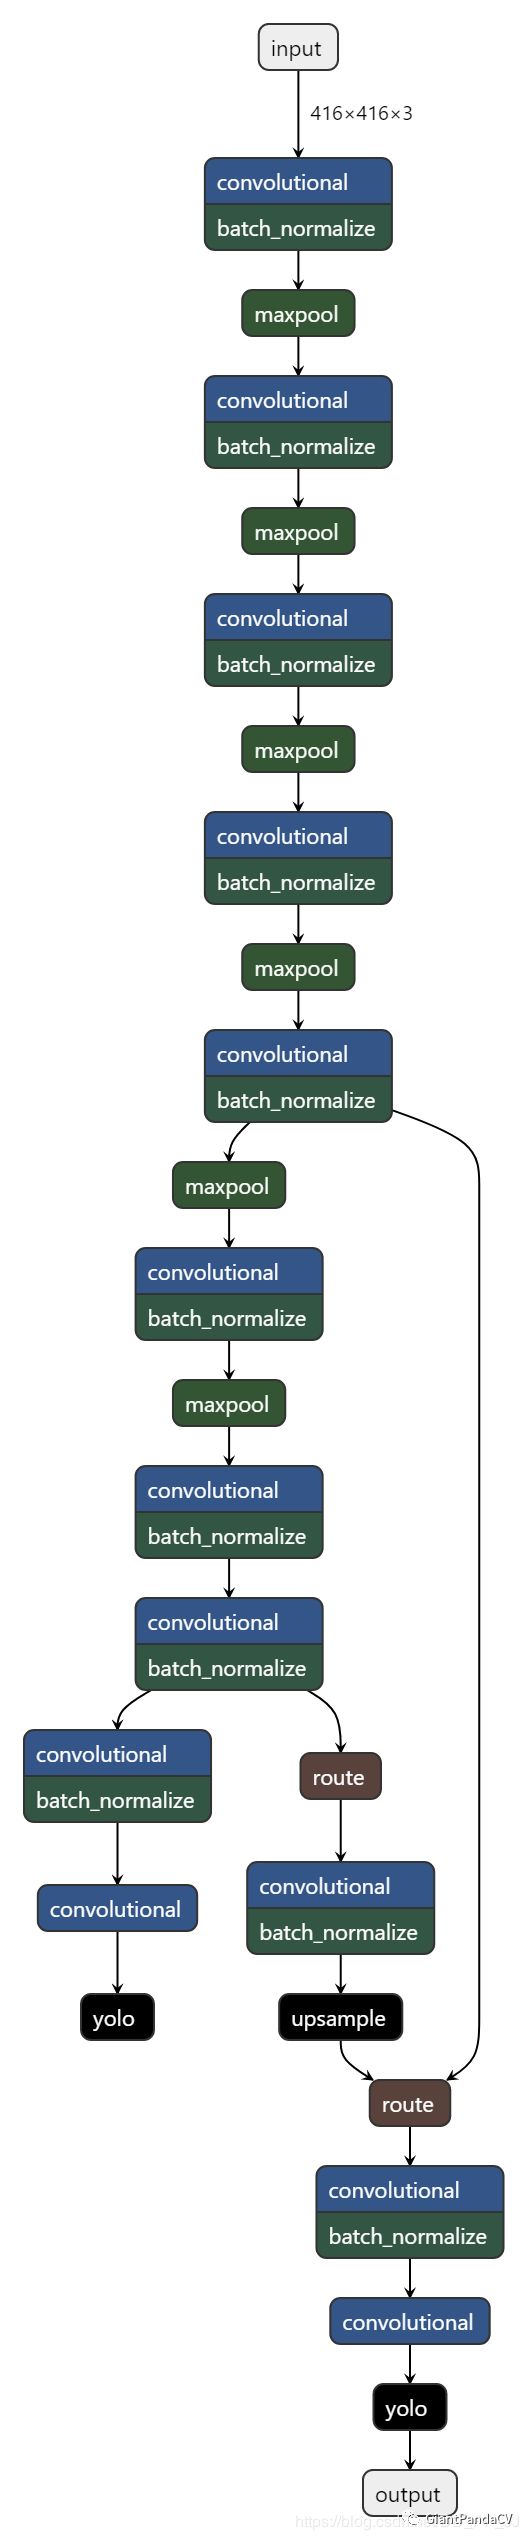
elif mdef['type'] == 'route':
# nn.Sequential() placeholder for 'route' layer
layers = [int(x) for x in mdef['layers'].split(',')]
filters = sum(
[output_filters[i + 1 if i > 0 else i] for i in layers])
# extend表示添加一系列对象
routs.extend([l if l > 0 else l + i for l in layers])

elif mdef['type'] == 'shortcut':
# nn.Sequential() placeholder for 'shortcut' layer
filters = output_filters[int(mdef['from'])]
layer = int(mdef['from'])
routs.extend([i + layer if layer < 0 else layer])

elif mdef['type'] == 'yolo':
yolo_index += 1
mask = [int(x) for x in mdef['mask'].split(',')] # anchor mask
modules = YOLOLayer(
anchors=mdef['anchors'][mask], # anchor list
nc=int(mdef['classes']), # number of classes
img_size=img_size, # (416, 416)
yolo_index=yolo_index, # 0, 1 or 2
arc=arc) # yolo architecture

# 这是在focal loss文章中提到的为卷积层添加bias
# 主要用于解决样本不平衡问题
# (论文地址 https://arxiv.org/pdf/1708.02002.pdf section 3.3)
# 具体讲解见下方
try:
if arc == 'defaultpw' or arc == 'Fdefaultpw':
# default with positive weights
b = [-5.0, -5.0] # obj, cls
elif arc == 'default':
# default no pw (40 cls, 80 obj)
b = [-5.0, -5.0]
elif arc == 'uBCE':
# unified BCE (80 classes)
b = [0, -9.0]
elif arc == 'uCE':
# unified CE (1 background + 80 classes)
b = [10, -0.1]
elif arc == 'Fdefault':
# Focal default no pw (28 cls, 21 obj, no pw)
b = [-2.1, -1.8]
elif arc == 'uFBCE' or arc == 'uFBCEpw':
# unified FocalBCE (5120 obj, 80 classes)
b = [0, -6.5]
elif arc == 'uFCE':
# unified FocalCE (64 cls, 1 background + 80 classes)
b = [7.7, -1.1]

bias = module_list[-1][0].bias.view(len(mask), -1)
# 255 to 3x85
bias[:, 4] += b[0] - bias[:, 4].mean() # obj
bias[:, 5:] += b[1] - bias[:, 5:].mean() # cls

# 将新的偏移量赋值回模型中
module_list[-1][0].bias = torch.nn.Parameter(bias.view(-1))

except:
print('WARNING: smart bias initialization failure.')

else:
print('Warning: Unrecognized Layer Type: ' + mdef['type'])

# 将module内容保存在module_list中。
module_list.append(modules)
# 保存所有的filter个数
output_filters.append(filters)

return module_list, routs

bias部分讲解

其中在YOLO Layer部分涉及到一个初始化的trick,来自Focal Loss中关于模型初始化的讨论,具体内容请阅读论文,https://arxiv.org/pdf/1708.02002.pdf 的第3.3节。

这里涉及到一个非常insight的点,在第一篇中介绍了,YOLO层前一个卷积的filter个数计算公式如下:

5代表x,y,w,h, score,score代表该格子中是否存在目标,3代表这个格子中会分配3个anchor进行匹配。在YOLOLayer中的forward函数中,有以下代码,需要通过sigmoid激活函数:

1
2
3
4
5
6
7
8
if 'default' in self.arc:  # seperate obj and cls
torch.sigmoid_(io[..., 4])
elif 'BCE' in self.arc: # unified BCE (80 classes)
torch.sigmoid_(io[..., 5:])
io[..., 4] = 1
elif 'CE' in self.arc: # unified CE (1 background + 80 classes)
io[..., 4:] = F.softmax(io[..., 4:], dim=4)
io[..., 4] = 1

可以观察到,Sigmoid梯度是有限的,在[-5,5]之间。

而pytorch中的卷积层默认的初始化是以0为中心点的正态分布,这样进行的初始化会导致很多gird中大约一半得到了激活,在计算loss的时候就会计算上所有的激活的点对应的坐标信息,这样计算loss就会变得很大。

根据这个现象,作者选择在YOLOLayer的前一个卷积层添加bias,来避免这种情况,实际操作就是在原有的bias上减去5,这样通过卷积得到的数值就不会被激活,可以防止在初始阶段的第一个batch中就进行过拟合。通过以上操作,能够让所有的神经元在前几个batch中输出空的检测。

经过作者的实验,通过使用bias的trick,可以提升mAP、F1、P、R等指标,还能让训练过程更加平滑。

2.3 yolo_layers

代码如下:

1
2
3
def get_yolo_layers(model):
return [i for i, x in enumerate(model.module_defs) if x['type'] == 'yolo']
# [82, 94, 106] for yolov3

yolo layer的获取是通过解析module_defs这个存储cfg文件中的信息的变量得到的。以yolov3.cfg为例,最终返回的是yolo层在整个module的序号。比如:第83,94,106个层是YOLO层。

3. forward函数

在YOLO中,如果能理解前向传播的过程,那整个网络的构建也就很清楚明了了。

1
2
3
4
5
6
7
8
9
10
11
12
13
14
15
16
17
18
19
20
21
22
23
24
25
26
27
28
29
30
31
32
33
34
35
36
37
38
39
40
41
42
43
44
def forward(self, x, var=None):
img_size = x.shape[-2:]
layer_outputs = []
output = []

for i, (mdef,
module) in enumerate(zip(self.module_defs, self.module_list)):
mtype = mdef['type']
if mtype in ['convolutional', 'upsample', 'maxpool']:
# 卷积层,上采样,池化层只需要经过即可
x = module(x)
elif mtype == 'route':
# route操作就是将几个层的内容拼接起来,具体可以看cfg文件解析
layers = [int(x) for x in mdef['layers'].split(',')]
if len(layers) == 1:
x = layer_outputs[layers[0]]
else:
try:
x = torch.cat([layer_outputs[i] for i in layers], 1)
except:
# apply stride 2 for darknet reorg layer
layer_outputs[layers[1]] = F.interpolate(
layer_outputs[layers[1]], scale_factor=[0.5, 0.5])
x = torch.cat([layer_outputs[i] for i in layers], 1)

elif mtype == 'shortcut':
x = x + layer_outputs[int(mdef['from'])]
elif mtype == 'yolo':
output.append(module(x, img_size))
#记录route对应的层
layer_outputs.append(x if i in self.routs else [])

if self.training:
# 如果训练,直接输出YOLO要求的Tensor
# 3*(class+5)
return output

elif ONNX_EXPORT:# 这个是对应的onnx导出的内容
x = [torch.cat(x, 0) for x in zip(*output)]
return x[0], torch.cat(x[1:3], 1) # scores, boxes: 3780x80, 3780x4
else:
# 对应测试阶段
io, p = list(zip(*output)) # inference output, training output
return torch.cat(io, 1), p

forward的过程也比较简单,通过得到的module_defs和module_list变量,通过for循环将整个module_list中的内容进行一遍串联,需要得到的最终结果是YOLO层的输出。