1. 标注格式

voc_label.py,其作用是将xml文件转成txt文件格式,具体文件如下:

1
2
# class id, x, y, w, h
0 0.8604166666666666 0.5403899721448469 0.058333333333333334 0.055710306406685235

其中的x,y 的意义是归一化以后的框的中心坐标,w,h是归一化后的框的宽和高。

具体的归一化方式为:

1
2
3
4
5
6
7
8
9
10
11
12
13
14
15
16
17
18
19
def convert(size, box):
'''
size是图片的长和宽
box是xmin,xmax,ymin,ymax坐标值
'''
dw = 1. / (size[0])
dh = 1. / (size[1])
# 得到长和宽的缩放比
x = (box[0] + box[1])/2.0
y = (box[2] + box[3])/2.0
w = box[1] - box[0]
h = box[3] - box[2]
# 分别计算中心点坐标,框的宽和高
x = x * dw
w = w * dw
y = y * dh
h = h * dh
# 按照图片长和宽进行归一化
return (x,y,w,h)

可以看出,归一化都是相对于图片的宽和高进行归一化的。

2. 调用

下边是train.py文件中的有关数据的调用:

1
2
3
4
5
6
7
8
9
10
11
12
13
14
15
16
17
18
19
20
21
# Dataset
dataset = LoadImagesAndLabels(train_path, img_size, batch_size,
augment=True,
hyp=hyp, # augmentation hyperparameters
rect=opt.rect, # rectangular training
cache_labels=True,
cache_images=opt.cache_images)

batch_size = min(batch_size, len(dataset))

# 使用多少个线程加载数据集
nw = min([os.cpu_count(), batch_size if batch_size > 1 else 0, 1])

dataloader = DataLoader(dataset,
batch_size=batch_size,
num_workers=nw,
shuffle=not opt.rect,
# Shuffle=True
# unless rectangular training is used
pin_memory=True,
collate_fn=dataset.collate_fn)

在pytorch中,数据集加载主要是重构datasets类,然后再使用dataloader中加载dataset,就构建好了数据部分。

下面是一个简单的使用模板:

1
2
3
4
5
6
7
8
9
10
11
12
13
14
15
16
17
18
19
20
21
22
23
24
25
26
27
28
29
30
31
32
33
34
35
36
37
import os
from torch.utils.data import Dataset
from torch.utils.data import DataLoader

# 根据自己的数据集格式进行重构
class MyDataset(Dataset):
def __init__(self):
#下载数据、初始化数据,都可以在这里完成
xy = np.loadtxt('label.txt', delimiter=',', dtype=np.float32)
# 使用numpy读取数据
self.x_data = torch.from_numpy(xy[:, 0:-1])
self.y_data = torch.from_numpy(xy[:, [-1]])
self.len = xy.shape[0]

def __getitem__(self, index):
# dataloader中使用该方法,通过index进行访问
return self.x_data[index], self.y_data[index]

def __len__(self):
# 查询数据集中数量,可以通过len(mydataset)得到
return self.len

# 实例化这个类,然后我们就得到了Dataset类型的数据,记下来就将这个类传给DataLoader,就可以了。
myDataset = MyDataset()

# 构建dataloader
train_loader = DataLoader(dataset=myDataset,
batch_size=32,
shuffle=True)

for epoch in range(2):
for i, data in enumerate(train_loader):
# 将数据从 train_loader 中读出来,一次读取的样本数是32个
inputs, labels = data
# 将这些数据转换成Variable类型
inputs, labels = Variable(inputs), Variable(labels)
# 模型训练...

通过以上模板就能大致了解pytorch中的数据加载机制,下面开始介绍YOLOv3中的数据加载。

3. YOLOv3中的数据加载

下面解析的是LoadImagesAndLabels类中的几个主要的函数:

3.1 init函数

init函数中包含了大部分需要处理的数据

1
2
3
4
5
6
7
8
9
10
11
12
13
14
15
16
17
18
19
20
21
22
23
24
25
26
27
28
29
30
31
32
33
34
35
36
37
38
39
40
41
42
43
44
45
46
47
48
49
50
51
52
53
54
55
56
57
58
59
60
61
62
63
64
65
66
67
68
69
70
71
72
73
74
75
76
77
78
79
80
81
82
83
84
85
86
87
88
89
90
91
92
93
94
95
96
97
98
99
100
101
102
103
104
105
106
107
108
109
110
111
112
113
114
115
116
117
118
119
120
121
122
123
124
125
126
127
128
129
130
131
132
133
134
135
136
137
138
139
140
141
142
143
144
145
146
147
148
149
150
151
152
153
154
155
156
157
158
159
160
161
162
163
164
165
166
167
168
169
170
171
172
173
174
175
176
177
178
179
180
181
182
183
184
185
186
187
class LoadImagesAndLabels(Dataset):  # for training/testing
def __init__(self,
path,
img_size=416,
batch_size=16,
augment=False,
hyp=None,
rect=False,
image_weights=False,
cache_labels=False,
cache_images=False):
path = str(Path(path)) # os-agnostic
assert os.path.isfile(path), 'File not found %s. See %s' % (path,
help_url)
with open(path, 'r') as f:
self.img_files = [
x.replace('/', os.sep)
for x in f.read().splitlines() # os-agnostic
if os.path.splitext(x)[-1].lower() in img_formats
]
# img_files是一个list,保存的是图片的路径

n = len(self.img_files)
assert n > 0, 'No images found in %s. See %s' % (path, help_url)
bi = np.floor(np.arange(n) / batch_size).astype(np.int) # batch index
# 如果n=10, batch=2, bi=[0,0,1,1,2,2,3,3,4,4]
nb = bi[-1] + 1 # 最多有多少个batch

self.n = n
self.batch = bi # 图片的batch索引,代表第几个batch的图片
self.img_size = img_size
self.augment = augment
self.hyp = hyp
self.image_weights = image_weights # 是否选择根据权重进行采样
self.rect = False if image_weights else rect
# 如果选择根据权重进行采样,将无法使用矩形训练:
# 具体内容见下文

# 标签文件是通过images替换为labels, .jpg替换为.txt得到的。
self.label_files = [
x.replace('images',
'labels').replace(os.path.splitext(x)[-1], '.txt')
for x in self.img_files
]

# 矩形训练具体内容见下文解析
if self.rect:
# 获取图片的长和宽 (wh)
sp = path.replace('.txt', '.shapes')
# 字符串替换
# shapefile path
try:
with open(sp, 'r') as f: # 读取shape文件
s = [x.split() for x in f.read().splitlines()]
assert len(s) == n, 'Shapefile out of sync'
except:
s = [
exif_size(Image.open(f))
for f in tqdm(self.img_files, desc='Reading image shapes')
]
np.savetxt(sp, s, fmt='%g') # overwrites existing (if any)

# 根据长宽比进行排序
s = np.array(s, dtype=np.float64)
ar = s[:, 1] / s[:, 0] # aspect ratio
i = ar.argsort()

# 根据顺序重排顺序
self.img_files = [self.img_files[i] for i in i]
self.label_files = [self.label_files[i] for i in i]
self.shapes = s[i] # wh
ar = ar[i]

# 设置训练的图片形状
shapes = [[1, 1]] * nb
for i in range(nb):
ari = ar[bi == i]
mini, maxi = ari.min(), ari.max()
if maxi < 1:
shapes[i] = [maxi, 1]
elif mini > 1:
shapes[i] = [1, 1 / mini]

self.batch_shapes = np.ceil(
np.array(shapes) * img_size / 32.).astype(np.int) * 32

# 预载标签
# weighted CE 训练时需要这个步骤
# 否则无法按照权重进行采样
self.imgs = [None] * n
self.labels = [None] * n
if cache_labels or image_weights: # cache labels for faster training
self.labels = [np.zeros((0, 5))] * n
extract_bounding_boxes = False
create_datasubset = False
pbar = tqdm(self.label_files, desc='Caching labels')
nm, nf, ne, ns, nd = 0, 0, 0, 0, 0 # number missing, found, empty, datasubset, duplicate
for i, file in enumerate(pbar):
try:
# 读取每个文件内容
with open(file, 'r') as f:
l = np.array(
[x.split() for x in f.read().splitlines()],
dtype=np.float32)
except:
nm += 1 # print('missing labels for image %s' % self.img_files[i]) # file missing
continue

if l.shape[0]:
# 判断文件内容是否符合要求
# 所有的值需要>0, <1, 一共5列
assert l.shape[1] == 5, '> 5 label columns: %s' % file
assert (l >= 0).all(), 'negative labels: %s' % file
assert (l[:, 1:] <= 1).all(
), 'non-normalized or out of bounds coordinate labels: %s' % file
if np.unique(
l, axis=0).shape[0] < l.shape[0]: # duplicate rows
nd += 1 # print('WARNING: duplicate rows in %s' % self.label_files[i]) # duplicate rows

self.labels[i] = l
nf += 1 # file found

# 创建一个小型的数据集进行试验
if create_datasubset and ns < 1E4:
if ns == 0:
create_folder(path='./datasubset')
os.makedirs('./datasubset/images')
exclude_classes = 43
if exclude_classes not in l[:, 0]:
ns += 1
# shutil.copy(src=self.img_files[i], dst='./datasubset/images/') # copy image
with open('./datasubset/images.txt', 'a') as f:
f.write(self.img_files[i] + '\n')

# 为两阶段分类器提取目标检测的检测框
# 默认开关是关掉的,不是很理解
if extract_bounding_boxes:
p = Path(self.img_files[i])
img = cv2.imread(str(p))
h, w = img.shape[:2]
for j, x in enumerate(l):
f = '%s%sclassifier%s%g_%g_%s' % (p.parent.parent,
os.sep, os.sep,
x[0], j, p.name)
if not os.path.exists(Path(f).parent):
os.makedirs(Path(f).parent)
# make new output folder

b = x[1:] * np.array([w, h, w, h]) # box
b[2:] = b[2:].max() # rectangle to square
b[2:] = b[2:] * 1.3 + 30 # pad

b = xywh2xyxy(b.reshape(-1,4)).ravel().astype(np.int)

b[[0,2]] = np.clip(b[[0, 2]], 0,w) # clip boxes outside of image
b[[1, 3]] = np.clip(b[[1, 3]], 0, h)
assert cv2.imwrite(f, img[b[1]:b[3], b[0]:b[2]]), 'Failure extracting classifier boxes'
else:
ne += 1

pbar.desc = 'Caching labels (%g found, %g missing, %g empty, %g duplicate, for %g images)'
% (nf, nm, ne, nd, n) # 统计发现,丢失,空,重复标签的数量。
assert nf > 0, 'No labels found. See %s' % help_url

# 将图片加载到内存中,可以加速训练
# 警告:如果在数据比较多的情况下可能会超出RAM
if cache_images: # if training
gb = 0 # 计算缓存到内存中的图片占用的空间GB为单位
pbar = tqdm(range(len(self.img_files)), desc='Caching images')
self.img_hw0, self.img_hw = [None] * n, [None] * n
for i in pbar: # max 10k images
self.imgs[i], self.img_hw0[i], self.img_hw[i] = load_image(
self, i) # img, hw_original, hw_resized
gb += self.imgs[i].nbytes
pbar.desc = 'Caching images (%.1fGB)' % (gb / 1E9)

# 删除损坏的文件
# 根据需要进行手动开关
detect_corrupted_images = False
if detect_corrupted_images:
from skimage import io # conda install -c conda-forge scikit-image
for file in tqdm(self.img_files,
desc='Detecting corrupted images'):
try:
_ = io.imread(file)
except:
print('Corrupted image detected: %s' % file)

Rectangular inference(矩形推理)

  1. 矩形推理是在detect.py,也就是测试过程中的实现,可以减少推理时间。YOLOv3中是下采样32倍,长宽也必须是32的倍数,所以在进入模型前,数据需要处理到416×416大小,这个过程称为仿射变换,如果用opencv实现可以用以下代码:
1
2
3
4
5
6
7
8
9
10
11
12
13
14
# 来自 https://zhuanlan.zhihu.com/p/93822508
def cv2_letterbox_image(image, expected_size):
ih, iw = image.shape[0:2]
ew, eh = expected_size
scale = min(eh / ih, ew / iw)
nh = int(ih * scale)
nw = int(iw * scale)
image = cv2.resize(image, (nw, nh), interpolation=cv2.INTER_CUBIC)
top = (eh - nh) // 2
bottom = eh - nh - top
left = (ew - nw) // 2
right = ew - nw - left
new_img = cv2.copyMakeBorder(image, top, bottom, left, right, cv2.BORDER_CONSTANT)
return new_img

比如下图是一个h>w,一个是w>h的图片经过仿射变换后resize到416×416的示例:

以上就是正方形推理,但是可以看出以上通过补充得到的结果会存在很多冗余信息,而Rectangular Training思路就是想要去掉这些冗余的部分。

具体过程为:求得较长边缩放到416的比例,然后对图片w:h按这个比例缩放,使得较长边达到416,再对较短边进行尽量少的填充使得较短边满足32的倍数。

示例如下:

Rectangular Training(矩形训练)

很自然的,训练的过程也可以用到这个想法,减少冗余。不过训练的时候情况比较复杂,由于在训练过程中是一个batch的图片,而每个batch图片是有可能长宽比不同的,这就是与测试最大的区别。具体是实现是取这个batch中最大的场合宽,然后将整个batch中填充到max width和max height,这样操作对小一些的图片来说也是比较浪费。这里的yolov3的实现主要就是优化了一下如何将比例相近的图片放在一个batch,这样显然填充的就更少一些了。作者在issue中提到,在coco数据集中使用这个策略进行训练,能够快1/3。

而如果选择开启矩形训练,必须要关闭dataloader中的shuffle参数,防止对数据的顺序进行调整。同时如果选择image_weights, 根据图片进行采样,也无法与矩阵训练同时使用。

3.2 getitem函数

1
2
3
4
5
6
7
8
9
10
11
12
13
14
15
16
17
18
19
20
21
22
23
24
25
26
27
28
29
30
31
32
33
34
35
36
37
38
39
40
41
42
43
44
45
46
47
48
49
50
51
52
53
54
55
56
57
58
59
60
61
62
63
64
65
66
67
68
69
70
71
72
73
74
75
76
77
78
79
80
81
82
83
84
85
86
87
88
89
90
91
92
93
94
95
96
97
98
99
100
101
102
103
104
def __getitem__(self, index):
# 新的下角标
if self.image_weights:
index = self.indices[index]

img_path = self.img_files[index]
label_path = self.label_files[index]

hyp = self.hyp
mosaic = True and self.augment
# 如果开启组合变化、数据增强
# 加载四张图片,作为一个拼图,具体看下文解析。
if mosaic:
# 加载拼图内容
img, labels = load_mosaic(self, index)
shapes = None

else:
# 加载图片
img, (h0, w0), (h, w) = load_image(self, index)

# 仿射变换
shape = self.batch_shapes[self.batch[
index]] if self.rect else self.img_size
img, ratio, pad = letterbox(img,
shape,
auto=False,
scaleup=self.augment)
shapes = (h0, w0), (
(h / h0, w / w0), pad)

# 加载标注文件
labels = []
if os.path.isfile(label_path):
x = self.labels[index]
if x is None: # 如果标签没有加载,读取label_path内容
with open(label_path, 'r') as f:
x = np.array(
[x.split() for x in f.read().splitlines()],
dtype=np.float32)

if x.size > 0:
# 将归一化后的xywh转化为左上角、右下角的表达形式
labels = x.copy()
labels[:, 1] = ratio[0] * w * (
x[:, 1] - x[:, 3] / 2) + pad[0] # pad width
labels[:, 2] = ratio[1] * h * (
x[:, 2] - x[:, 4] / 2) + pad[1] # pad height
labels[:, 3] = ratio[0] * w * (x[:, 1] +
x[:, 3] / 2) + pad[0]
labels[:, 4] = ratio[1] * h * (x[:, 2] +
x[:, 4] / 2) + pad[1]

if self.augment:
# 图片空间的数据增强
if not mosaic:
# 如果没有使用组合的方法,那么对图片进行随机放射
img, labels = random_affine(img,
labels,
degrees=hyp['degrees'],
translate=hyp['translate'],
scale=hyp['scale'],
shear=hyp['shear'])

# 增强hsv空间
augment_hsv(img,
hgain=hyp['hsv_h'],
sgain=hyp['hsv_s'],
vgain=hyp['hsv_v'])

nL = len(labels) # 标注文件个数

if nL:
# 将 xyxy 格式转化为 xywh 格式
labels[:, 1:5] = xyxy2xywh(labels[:, 1:5])

# 归一化到0-1之间
labels[:, [2, 4]] /= img.shape[0] # height
labels[:, [1, 3]] /= img.shape[1] # width

if self.augment:
# 随机左右翻转
lr_flip = True
if lr_flip and random.random() < 0.5:
img = np.fliplr(img)
if nL:
labels[:, 1] = 1 - labels[:, 1]

# 随机上下翻转
ud_flip = False
if ud_flip and random.random() < 0.5:
img = np.flipud(img)
if nL:
labels[:, 2] = 1 - labels[:, 2]

labels_out = torch.zeros((nL, 6))
if nL:
labels_out[:, 1:] = torch.from_numpy(labels)

# 图像维度转换
img = img[:, :, ::-1].transpose(2, 0, 1) # BGR to RGB, to 3x416x416
img = np.ascontiguousarray(img)

return torch.from_numpy(img), labels_out, img_path, shapes

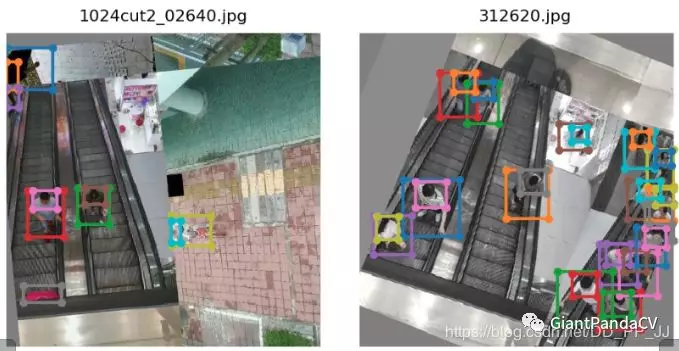
下图是开启了组合和旋转以后的增强效果

这里理解组合就是将四张图片,以不同的比例,合成为一张图片。

3.3 collate_fn函数

1
2
3
4
5
6
@staticmethod
def collate_fn(batch):
img, label, path, shapes = zip(*batch) # transposed
for i, l in enumerate(label):
l[:, 0] = i # add target image index for build_targets()
return torch.stack(img, 0), torch.cat(label, 0), path, shapes

还有最后一点内容,是关于pytorch的数据读取机制,在pytorch的dataloader中是会对通过getitem方法得到的结果(batch)进行包装,而这个包装可能与我们想要的有所不同。默认的方法可以看以下代码:

1
2
3
4
5
6
7
8
9
10
11
12
13
14
15
16
17
18
19
20
21
22
23
24
25
26
27
28
29
30
31
32
33
34
35
36
37
38
39
40
def default_collate(batch):
r"""Puts each data field into a tensor with outer dimension batch size"""

elem_type = type(batch[0])
if isinstance(batch[0], torch.Tensor):
out = None
if _use_shared_memory:
# If we're in a background process, concatenate directly into a
# shared memory tensor to avoid an extra copy
numel = sum([x.numel() for x in batch])
storage = batch[0].storage()._new_shared(numel)
out = batch[0].new(storage)
return torch.stack(batch, 0, out=out)
elif elem_type.__module__ == 'numpy' and elem_type.__name__ != 'str_' \
and elem_type.__name__ != 'string_':
elem = batch[0]
if elem_type.__name__ == 'ndarray':
# array of string classes and object
if np_str_obj_array_pattern.search(elem.dtype.str) is not None:
raise TypeError(error_msg_fmt.format(elem.dtype))

return default_collate([torch.from_numpy(b) for b in batch])
if elem.shape == (): # scalars
py_type = float if elem.dtype.name.startswith('float') else int
return numpy_type_map[elem.dtype.name](list(map(py_type, batch)))
elif isinstance(batch[0], float):
return torch.tensor(batch, dtype=torch.float64)
elif isinstance(batch[0], int_classes):
return torch.tensor(batch)
elif isinstance(batch[0], string_classes):
return batch
elif isinstance(batch[0], container_abcs.Mapping):
return {key: default_collate([d[key] for d in batch]) for key in batch[0]}
elif isinstance(batch[0], tuple) and hasattr(batch[0], '_fields'): # namedtuple
return type(batch[0])(*(default_collate(samples) for samples in zip(*batch)))
elif isinstance(batch[0], container_abcs.Sequence):
transposed = zip(*batch)
return [default_collate(samples) for samples in transposed]

raise TypeError((error_msg_fmt.format(type(batch[0]))))

会根据你的数据类型进行相应的处理,但是这往往不是我们需要的,所以需要修改collate_fn,具体内容请看代码,比较简单,就不多赘述。